

Artisanal Wax Melt Making Process Explained (2026)
Table of Contents
- Essential Materials and Tools for Artisanal Wax Melt Making
- Step-by-Step: Melting, Pouring, and Setting Your Wax Melts
- How to Choose Fragrance Oils for Wax Melts
- Wax Melt Curing Time Explained
- Artisanal Wax Melt Safety Tips
- Why Artisanal Wax Melts Stand Out
- Frequently Asked Questions
Last Updated: September 25, 2026
Essential Materials and Tools for Artisanal Wax Melt Making
The artisanal wax melt making process explained here starts with one truth: wax melts live or die by their ingredients. Get the wax and fragrance right, and everything else falls into place. At Ruby Creek Candle Co., we build every melt around that idea.
You need four core items before you begin:
- Wax (soy, beeswax, or a blend)
- A thermometer that reads up to 90°C
- A heat-safe pouring pitcher
- Silicone molds or clamshell trays
Waxes: Soy, Beeswax, and Paraffin
Soy wax is a vegetable wax made from soybean oil. It melts at a low temperature and holds fragrance well. Most home makers start here.
Fragrance Load and Additives
Fragrance load is the percentage of scent oil in your total wax weight. Most waxes hold 6% to 10% by weight. Push past the limit and the oil sweats out of the finished melt.
You will also want:
- Fragrance oils for strong, consistent scent
- Essential oils for a natural, softer aroma
- Liquid dye if you want color
- Mica powder for a shimmer finish
Step-by-Step: Melting, Pouring, and Setting Your Wax Melts
Here is the full method, start to finish. Total time runs about 45 minutes, plus curing.
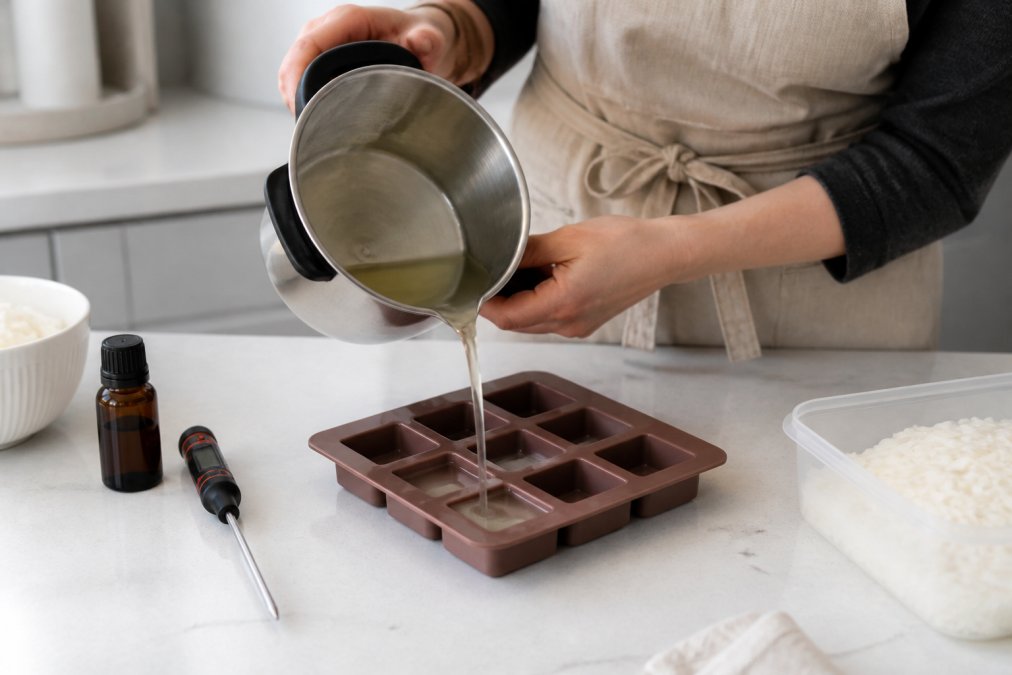
Preparing Your Workspace and Melting Safely
Set up on a heat-safe surface with good airflow. Lay down parchment or newspaper first.
Adding Fragrance and Pouring
Let the wax cool to its pouring temperature before you add scent. That is usually 55°C to 65°C.
How to Choose Fragrance Oils for Wax Melts
The right fragrance oil makes or breaks your hot throw, the scent you get when the melt warms in a burner. But hot throw is only half the picture. The other half is cold throw, the scent you notice from the clamshell before it ever melts. A melt with strong cold throw and weak hot throw smells great on the shelf and disappears in the warmer.
Cold Throw vs. Hot Throw: What Actually Drives Each
Cold throw comes from fragrance molecules that are volatile enough to escape the wax at room temperature. Hot throw comes from the full fragrance load releasing once the wax reaches its melt pool temperature, typically 60°C to 80°C depending on the wax. The two are not the same measurement, and a fragrance that excels at one can be flat at the other.
What controls the balance:
- Fragrance load percentage, more oil means more molecules available for both throws, up to the wax's absorption limit
- Wax chemistry, soy holds fragrance more tightly (better cold throw, slower release); paraffin releases faster (stronger hot throw, weaker cold throw)
- Cure time, a full cure lets the fragrance bind into the wax structure, which improves both throws
- Burner temperature, a 25-watt bulb produces a cooler melt pool than a tealight, which changes how much oil volatilizes
Fragrance Load Math You Can Actually Use
Fragrance load is the percentage of scent oil by total wax weight. Most waxes hold 6% to 10% by weight. Here is how that looks in practice:
- 100 g of wax at 6% load = 6 g fragrance oil
- 100 g of wax at 10% load = 10 g fragrance oil
- 500 g of wax at 8% load = 40 g fragrance oil
Matching Oil to Wax
Not every fragrance oil binds equally to every wax. A common pattern is that heavier, resinous scents (amber, oud, tobacco) bind well to soy and beeswax blends, while lighter citrus and aquatic notes can fade faster in soy and perform better in paraffin or a soy-paraffin blend. The only reliable test is a small batch in your own wax.
Flash Point: What It Means for Wax Melts
The flash point is the temperature at which a fragrance oil gives off ignitable vapors. Every bottle should list it. For wax melts, the flash point matters less than it does for candles because your melt pool never approaches flame temperatures, but it still tells you how much working room you have when adding oil to hot wax.
Essential Oils vs. Fragrance Oils
Essential oils are single-note, plant-derived, and generally weaker in wax than synthetic fragrance oils. Expect to need a higher load to match a fragrance oil, and expect the scent to fade faster in storage. Some essential oils, citrus in particular, are also more volatile and can lose their top notes during the pour.
Wax Melt Curing Time Explained
Wax melt curing time is the rest period after pouring, before the melt reaches full scent strength. Most melts need 5 to 14 days. Skip it and you will pour a melt that smells fine in the clamshell and weak in the warmer; the fragrance has not yet bound into the wax structure.
What Actually Happens During Cure
Curing is not just drying. During cure, fragrance molecules migrate from the surface of the wax into the crystalline structure of the wax itself. This does two things:
- It slows release. Bound fragrance volatilizes more gradually, which means a longer, more even hot throw instead of a sharp burst that fades in an hour.
- It stabilizes cold throw. Surface oil that has not bound will evaporate off during storage, leaving a weaker cold throw. Bound oil stays put.
Cure Times by Wax Type
- Soy wax: 7 to 14 days. Soy has a complex crystalline structure and takes the longest to fully bind fragrance.
- Paraffin: 3 to 7 days. Paraffin binds faster and releases faster, so it needs less cure but also fades sooner in storage.
- Beeswax blends: 10 to 14 days. Beeswax is dense and slow to absorb oil; blends with soy fall in the middle.
- Soy-paraffin blends: 5 to 10 days. The blend splits the difference on both cure time and throw character.
These are starting points, not rules. A high fragrance load (9% to 10%) needs a longer cure than a low load (6%). A heavy, resinous scent needs longer than a light citrus.
How to Cure Without Losing Scent
Cure is not passive storage. What you do during those days changes the result:
- Keep melts covered. An open clamshell lets volatile top notes escape. A closed lid traps them.
- Store in a cool, dark spot. Heat accelerates evaporation of the most volatile molecules; light can degrade some fragrance compounds.
- Do not refrigerate. Cold can cause the wax to contract and crack, and condensation on the surface introduces moisture.
- Do not stack heavy items on top. Freshly cured wax is still soft enough to deform under pressure.
How to Tell a Melt Is Fully Cured
There is no single test, but a common pattern is this: open the clamshell at day 5 and again at day 10. If the cold throw has stopped getting stronger between the two checks, the melt is likely cured. If it is still intensifying, give it more time.
Artisanal Wax Melt Safety Tips
These artisanal wax melt safety tips keep your home and your product safe. Follow them every batch.
- Use a burner rated for wax melts, not candles
- Keep melts away from pets and small children
- Never add water to a wax burner
- Use a 25-watt bulb or a tealight, never a stronger heat source
- Let the melt pool cool fully before you touch it
Curing and labeling are the two steps beginners skip most. Both decide whether your melt performs and whether you can legally sell it. In Canada, labeling must also meet bilingual requirements under the Consumer Product Safety Act.
Why Artisanal Wax Melts Stand Out
Mass-produced melts often use cheap paraffin and low fragrance loads. They smell fine in the package and fade fast in the burner.
Frequently Asked Questions
What is the 84 rule in candle making?
The 84 rule is a guideline for wax melt making that suggests using 1 ounce of fragrance oil per pound of wax, which equals about 6.25% fragrance load. However, this is a starting point. Most waxes can hold between 6% and 10% fragrance load. For artisanal wax melt making, test small batches with different percentages to find the strongest scent throw without causing seepage or poor set.
Why is the curing process important for wax melts?
Curing allows the fragrance oil to fully bind with the wax, which improves both cold throw and hot throw. Without curing, the scent may be weak or fade quickly. For wax melt curing time explained simply: most wax melts need 1 to 2 weeks of curing at room temperature. Soy wax often needs the full two weeks, while paraffin may cure faster. Proper curing makes a noticeable difference in scent strength and longevity.
What safety standards should be followed when crafting wax melts?
Follow these artisanal wax melt safety tips: always use a double boiler or dedicated melter, never direct heat. Keep a thermometer handy and never let wax exceed 85°C (185°F). Use heat-safe containers and avoid water contact with hot wax. Work in a ventilated area and keep a fire extinguisher nearby. For finished products, label with usage instructions and warnings. In Canada, follow the Consumer Product Safety Act and ensure your labels meet bilingual requirements.
How do artisanal wax melts differ from mass-produced alternatives?
Artisanal wax melts are typically made in small batches with higher-quality ingredients, such as natural soy wax or beeswax, and premium fragrance oils. Mass-produced melts often use paraffin and synthetic fragrances with lower fragrance loads. Artisanal makers focus on curing time, wickless design, and unique scent blends. The result is a stronger, cleaner scent throw and a more personal product. Ruby Creek Candle Co. specializes in handcrafted wax melts, not candles, ensuring each batch meets high standards.
Most store-bought melts fade within days, and that disappointment is common. Ruby Creek Candle Co. solves it with handcrafted wax melts, full fragrance loads, and a proper cure on every batch. Browse the collection and find a scent that turns your space into somewhere you want to stay. Shop now.